Running the Wires for Structured Wiring
So you have laid out your wiring plan, have all your supplies, and are ready to wire your house. This guide tells you what you need to know to do the actual wiring. This guide will start with some basic rules, then has some pictures on properly running the wires, and also some pictures that will help you locate where ductwork will be run so that you can avoid it. Finally, there is the "Don't do this" section of common mistakes to avoid.
Start by running the longest wires first. The reason for this is if you have 30' left over in your spool, you might still be able to use it somewhere. If you run the shortest runs first, then you will have more waste.
Start each wire upstairs and pull it through to the basement. This way, you do not need to use a ladder to push the wire up between floors.
Do not put two electrical boxes on opposite sides of the same stud. Doing this requires the drywaller to cut two holes only 1 1/2 inches apart. This is difficult and usually results in a broken piece of drywall that will just be patched later. You should also not put an electrical box right in the corner of a room for the same reason.
You will mount your electrical boxes at the same height that the builder's electrician's boxes. This will be around 12-16" from the floor to the bottom of the box. Sometimes, a builder will use their hammer height as a standard for mounting boxes. I used a 12" T-Square to measure the height of mine.
You may want to mount all of the electrical boxes first just so you know where you will be running the wires. You can mount the boxes and write on the stud what wires are needed using a sharpie. Then you can get to the business of running wires without having to go back and keep looking at your wiring plan.
Run all of the wires next. Save the stapling of the wires and placing the wires in the electrical box for the end. For the first one or two wire runs you may want to ignore this rule and install the boxes and staple the wires down before you cut the wire just to make sure you understand how much slack you will need. You should also leave at least one foot of extra wire at each end just in case you need to move things around later.
Before drilling any holes, make sure to look at what is on the other side of the wall/floor. You don't want to drill through any electrical wires, ductwork, or water pipes...
Do not run wires parallel to any power lines. It is OK to cross a power wire at a 90 degree angle. Power is usually run around the edges of the basement, so run your wires internally along a floor joist. If you need to run your wires perpendicular to a floor joist, try to do it along a duct or I beam. That way if you finish your basement later, these wires wont interfere with a drywall ceiling.
Run the wires vertically from floor ceiling and then along the floor joists. Do not run a wire horizontally in the middle of a wall. Doing so increases the chance that someone will put a nail through it. Try to keep the wire as close to the stud as possible. This is especially true for an exterior wall where insulation will be installed.
After running the wires, make sure to label each end (using stickers or writing on the wire with a felt tip marker) and make a note of the label for the wire and its location. I use a letter to represent each electrical box, and then a number for each wire in the box. For example: I will label the electrical box behind the entertainment center in the family room as "A". Each wire in the box gets a number "1", "2", "3"... At the other end at the wiring panel I label the wires "A1", "A2", "A3"...
After the wires are run, you need to staple them down. Stapling keeps the wires in place so that they don't come out of the electrical boxes. It also holds them up and out of the way of the drywallers and so that they don't hang down in the ceiling. You should always staple the wire right before it enters an electrical box, and also right after it comes through the hole in the floor. When running a wire along a stud, try to keep the wire centered in the stud. That reduces the chance that a nail will go through the wire from either end. For many wires, you can nail the staple into the joist/stud and the use a wire tie to attach the wires to that staple. This method also ensures that the staples cannot damage the wire.
If the end of the wire does not terminate in an electrical box, then you will need to measure the location of the wire. Measure from the closest corner of the room. Do not measure from a window. Also record if the wire is on the left or right side of the stud. For example, if the wire is attached to the left side of a stud, and you record that the wire is 90" away from the wall, when looking for that wire later your stud finder will tell you that there is a stud at 90". You won't know which side of the stud to cut the drywall on. For complicated runs, you may even want to use a digital camera to record the location of wires. Also remember to add or subtract 3/4" from the measurement to account for the thickness of the drywall where you will start your measurement.
After running the wires through the electrical box, be sure to shove all of the wires in the box. Drywallers want to work fast, and any wires sticking out of the box may just get drywalled over. They could also get cut as the hole is cut for the electrical box. The builders will probably not take the time to place the wires in the box themselves. Also, if the wires stick out of the box or are very close to the front of the box then they will get covered in paint and may cover up your labeling or the labels could get torn off.
Some people run the wires straight through the box. The wire coming through the bottom of the box is stapled tight to the stud. The wire then passes through the top of the box and is loosely held to the stud with another staple. When finishing the installation, you can pull the end of the wire back into the box. The loose staple only holds it in place for the drywallers. I don't recommend this method because the builder should be insulating each electrical box (as long as it is on an exterior wall) with expanding foam so that you can't get cold air coming through the box. If the builder sprays Great Stuff into the back of each electrical box, then you wont be able to get the end of that wire back into the box. I also don't like using backless electrical boxes for the same reason.
Wait to install the wall plates and in-wall speakers until the drywall has been installed and painted. You can choose to terminate each wire properly as the builder is still working on the home or you can wait until you move in. If you finish the installation up front, then there is a chance that the town's appraiser will see it and you could affect your home's appraised value and tax bill. For my home, I used blank wall plates during the building phase and then finished the work later. Local codes will probably require that you cover all exposed electrical boxes even if there isn't any power in the box so leaving electrical boxes open is not an option.
When running wires before the HVAC (Heating, Ventilation, & Air Condition) installers have done their work, you need to run your wires without interfering with what they need to do. The HVAC installers will install ducts that deliver the hot or cold air to the home, and returns that feed the air back into the furnace. Vents are usually installed on the floor or low on the wall under a window. The ductwork for a second floor vent is run vertically on an interior wall, and then across the floor joists for the second floor. Returns are usually near the ceiling on an interior wall. Since air loss isn't an issue on a return, the installers don't use ductwork for returns. They will use walls, studs, floor joists... as their duct. Ducts for vents should be avoided inside walls. Returns in the basement should be avoided between the floor joists. There are some specific examples with drawings and pictures below.
Wiring from Basement to Second Floor
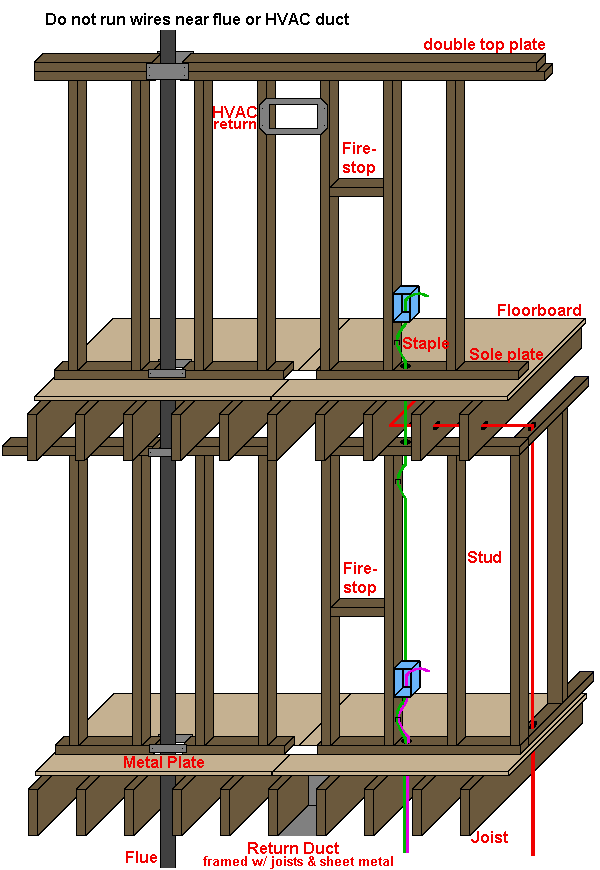
When running wires from the basement to outlets on the first or second floor, be sure to avoid the flue and any HVAC ducts. When possible, avoid running wires in the ceiling against the joists (red wire above). Instead, try to get right under the outlet from the basement and then run it straight up (green wire above). The same goes for in-ceiling speakers. Avoid drilling through the joists if you can. You may also want to review our guide on wiring existing homes for more examples.